Learn how to frame a staircase with winders for landings with these free DIY instructions. Examine the 2012 IRC requirements from start to finish. The codes are based on information taken from page 89 of the 2012 International Residential Code.
Room for the Staircase
The first step is to calculate the risers. Do this by using this Step Calculator to enter in the total rise. This is the vertical measurement from the top of the finished floor at the beginning level to the top of the finished floor on the ending level. The calculator will return the individual riser and the number of steps automatically.
Make an accurate layout on the floor based on the number of steps the calculator returns and the information in the following paragraph. The top step does not have to go flush with the ending level; it can drop down a step. The winders are the three steps that turn the direction of travel by 90º. Due to the nature of the code requirements that govern them, it is necessary to have a 45º flat spot that is 6″ long on the inside part of where the two walls meet. Without this, it is impossible to achieve satisfaction for the building codes. So if the walls have already been framed, then they must be altered. It is not that difficult and will only take about 30 minutes at the most.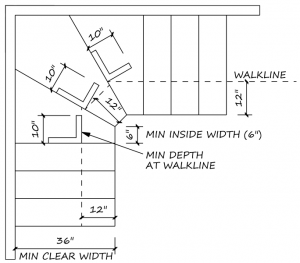
One of the toughest challenges when you are framing a winding staircase is to make it fit while keeping headroom and satisfying other requirements of the floor plan. Often the blueprints are drawn with 9″ runs and 8′ walls. When the real application has to have 10″ runs minimum, or the walls have been raised, it can be next to impossible to make the stairs work without expanding the space for it. This can not interfere with any critical dimension such as the space for a toilet, or the size of a hall.
Build The Winding Stairs
Once the layout s satisfactory, find the height of each winder using the landing section of our calculator. The results are automatically fired, so record each one on a nearby framing member.
Build the bottom winder first. It should be as large as the footprint for all of the winders put together. Build a frame with 2 x 10’s just like it was a miniature floor system. Use AdvanTech for the decking. Be sure the top of the finished floor for each winder is in accordance with the individual riser generated by the calculator.
Build the set of steps connecting the bottom winder to the floor. Test the lay out of the stringer before nailing anything. Remember to make allowances for different flooring materials and backings. Typically this means taking off an extra 1/4″ of the the bottom of the stringer to allow the difference between 1″ treads. Whatever the case, it is the finished walking surface that will be tested.
Build the next two winders by ripping down 2 x 10’s to a dimension that equals the individual risers minus 3/4″ (AdvanTech). In other words, if the individual riser calculated is 7 1/2″, then rip the framing members for the next two winders down to 6 3/4″. Follow the layout made on the floor to precision.
Build the top set of steps connecting the top winder to the ending level. Just like the bottom set of steps, there is three stringers laid out from a common pattern after it has been tested to meet the riser and run requirements. If the finished treads will be hardwood, then use temporary ones tacked down just enough to hold them still.
Framing Codes for Stairs
The stairs must have a minimum finished width of 36″. This measurement is taken above the handrail and below the headroom. For our purposes, make sure there is a minimum of 37″ between the framed walls.
At no point can the headroom drop below 6′ 8″. This is a vertical measurement from a sloped line along the nose of the steps up to the ceiling. An exception allows a floor to project horizontally into the headroom a maximum of 4 1/2″, but I recommend never to do this unless it is absolutely necessary.
The winder treads have to maintain a minimum of 6″ at their narrowest point. They must also maintain 10″ run at the 12″ walk line measuring from the inside out.
Do’s and Don’ts
- Never trust a lay out without testing the stringer, the winders, and everything else.
- Use at least 3″ x .120″ nails.
- Do not glue temporary treads.
- Glue everything else with construction grade adhesive.
- Use pressure treated plates at the bottom the lowest stringers if they rest on concrete.
- Be sure to allow for drywall by attaching a 2 x 4 to the outside edge of the stringers.
- Use good quality lumber throughout the entire framing process.